自编译Openwrt固件实现绕过校园网多设备检测
✨ AI摘要:本文介绍了如何自编译OpenWrt固件,以绕过校园网的多设备检测。通过修改TTL值和用户代理(UA),可以实现欺骗网关的目的。教程详细描述了从编译环境设置、依赖包安装、源码拉取到固件编译的全过程,并提供了适用于小米路由器4A千兆版v1的固件下载链接。最后,文章强调了操作的风险,并建议用户在进行相关操作时谨慎行事。
Powered by SparkU AI Platform
概述
鸣谢:32ESPLiego
由于学校的NT校园网在本学期开启了共享检测,导致之前的克隆Mac地址的方法在路由器上无法使用,在网上搜寻方法后,自己简单整理了一下网上各位大神的操作,理论上通过修改TTL以及UA来实现绕过多网关的多设备检测功能
原理是TTL值在不同的设备上不同,通过让路由器修改各设备TTL的值为相同,此外让路由器修改设备的UA(记录设备的浏览器型号,系统版本等信息)为一致,可以在一定程度上达到欺骗网关的目的
本教程将从编译到安装配置的过程介绍完整的操作流程,如有需要可根据大纲自行跳转需要的部分
如果你的路由器设备和作者使用的都是小米路由器4A千兆版v1,如果不想自己编译可跳转到文章末尾的下载部分下载作者编译好的固件文件,下载后请记得校验MD5或者SHA256以防固件损坏
编译过程
提示:本教程操作需要稳定的网络连接,为防止操作过程中出错或无法拉取源代码,建议使用代理软件或使用境外服务器
作者使用的编译环境是Windows10 + WSL(Ubuntu 22.04)+ Clash
路由器型号为:小米路由器4A千兆版v1(本教程暂不支持v2版本)
为了让WSL内的Ubuntu可以正常使用代理网络,可前往Clash的“通用”设置内,打开“Allow LAN”,然后安装“Service Mode”,待旁边出现一个绿色小地球的图标时,打开“TUN Mode”,然后重启WSL即可
由于使用的系统环境是WSL,但是部分用户可能是服务端Ubuntu,只有root用户,所以教程中的
sudo指令是为了让桌面端或者WSL的用户方便操作,系统只有root的用户可忽略sudo指令前缀安装过程中不要把校园网的网线插在你要刷机的路由器上,直到教程说到可以插上的时候再插
本教程不保证能够完全绕过校园网验证机制,仅供学习研究使用,若因此造成的损失或其它问题概不负责
更新apt源以及更新软件包
sudo apt update && sudo apt upgrade如果更新速度慢,可以替换镜像源为清华源
下面展示的修改Ubuntu22.04 LTS版本的镜像源配置文件内容,其他版本系统可查阅:清华大学开源软件镜像站Ubuntu帮助
# 默认注释了源码镜像以提高 apt update 速度,如有需要可自行取消注释
deb https://mirrors.tuna.tsinghua.edu.cn/ubuntu/ jammy main restricted universe multiverse
# deb-src https://mirrors.tuna.tsinghua.edu.cn/ubuntu/ jammy main restricted universe multiverse
deb https://mirrors.tuna.tsinghua.edu.cn/ubuntu/ jammy-updates main restricted universe multiverse
# deb-src https://mirrors.tuna.tsinghua.edu.cn/ubuntu/ jammy-updates main restricted universe multiverse
deb https://mirrors.tuna.tsinghua.edu.cn/ubuntu/ jammy-backports main restricted universe multiverse
# deb-src https://mirrors.tuna.tsinghua.edu.cn/ubuntu/ jammy-backports main restricted universe multiverse

# deb https://mirrors.tuna.tsinghua.edu.cn/ubuntu/ jammy-security main restricted universe multiverse
# # deb-src https://mirrors.tuna.tsinghua.edu.cn/ubuntu/ jammy-security main restricted universe multiverse

deb http://security.ubuntu.com/ubuntu/ jammy-security main restricted universe multiverse
# deb-src http://security.ubuntu.com/ubuntu/ jammy-security main restricted universe multiverse

# 预发布软件源,不建议启用
# deb https://mirrors.tuna.tsinghua.edu.cn/ubuntu/ jammy-proposed main restricted universe multiverse
# # deb-src https://mirrors.tuna.tsinghua.edu.cn/ubuntu/ jammy-proposed main restricted universe multiverse
安装依赖软件包
sudo apt install -y ack antlr3 aria2 asciidoc autoconf automake autopoint binutils bison build-essential \
bzip2 ccache cmake cpio curl device-tree-compiler fastjar flex gawk gettext gcc-multilib g++-multilib \
git gperf haveged help2man intltool libc6-dev-i386 libelf-dev libglib2.0-dev libgmp3-dev libltdl-dev \
libmpc-dev libmpfr-dev libncurses5-dev libncursesw5-dev libreadline-dev libssl-dev libtool lrzsz \
mkisofs msmtp nano ninja-build p7zip p7zip-full patch pkgconf python2.7 python3 python3-pip libpython3-dev qemu-utils \
rsync scons squashfs-tools subversion swig texinfo uglifyjs upx-ucl unzip vim wget xmlto xxd zlib1g-dev
拉取OpenWRT源码
git clone https://github.com/openwrt/openwrt.git切换分支至openwrt-23.05
git checkout openwrt-23.05安装并更新Feed源
./scripts/feeds clean
./scripts/feeds update -a
./scripts/feeds install -a
加入UA2F插件
git clone https://github.com/Zxilly/UA2F.git package/UA2F修改固件分区表,防止编译后无法启动Openwrt系统(重要)
为什么说这一点非常重要,因为早在半年多之前已经在折腾的教程了,到最后编译出来固件后安装kernel固件可以启动,但是安装sysupgrade固件后就陷入了无限重启的问题,导致无法开机
直到后面查看其它的编译项目的时候发现了要对R4A设备的固件分区进行修改调整,因为Breed固件并不是专门为R4A开发的,所以需要做调整以适配
在执行以下操作时请先对要修改的文件进行备份,以备不时之需
打开openwrt源码目录的这个文件:
target\linux\ramips\image\mt7621.mkCtrl+F搜索
define Device/xiaomi_mi-router-4a-gigabit将这一段修改为下方所示:
define Device/xiaomi_mi-router-4a-gigabit
  $(Device/dsa-migration)
  $(Device/uimage-lzma-loader)
  IMAGE_SIZE := 16064k
  DEVICE_VENDOR := Xiaomi
  DEVICE_MODEL := Mi Router 4A
  DEVICE_VARIANT := Gigabit Edition
  DEVICE_PACKAGES := kmod-mt7603 kmod-mt76x2 -uboot-envtools wpad-mini -wpad-basic-mbedtls -coremark -htop -bash -openssh-sftp-server
endef
TARGET_DEVICES += xiaomi_mi-router-4a-gigabit
然后保存退出
然后打开源码目录的这个文件:
target/linux/ramips/dts/mt7621_xiaomi_mi-router-4a-common.dtsi
将其内容全部修改为如下// SPDX-License-Identifier: GPL-2.0-or-later OR MIT #include "mt7621.dtsi" #include <dt-bindings/gpio/gpio.h> #include <dt-bindings/input/input.h> / { aliases { led-boot = &led_status_yellow; led-failsafe = &led_status_yellow; led-running = &led_status_blue; led-upgrade = &led_status_yellow; }; chosen { bootargs = "console=ttyS0,115200n8"; }; keys { compatible = "gpio-keys"; reset { label = "reset"; gpios = <&gpio 18 GPIO_ACTIVE_LOW>; linux,code = <KEY_RESTART>; }; }; }; &spi0 { status = "okay"; flash@0 { compatible = "jedec,spi-nor"; reg = <0>; spi-max-frequency = <50000000>; m25p,fast-read; partitions: partitions { compatible = "fixed-partitions"; #address-cells = <1>; #size-cells = <1>; partition@0 { label = "u-boot"; reg = <0x0 0x30000>; read-only; }; partition@30000 { label = "u-boot-env"; reg = <0x30000 0x10000>; read-only; }; factory: partition@40000 { label = "factory"; reg = <0x40000 0x10000>; read-only; }; partition@50000 { compatible = "denx,uimage"; label = "firmware"; reg = <0x50000 0xfb0000>; }; }; }; }; &pcie { status = "okay"; }; &pcie0 { wifi0: wifi@0,0 { compatible = "mediatek,mt76"; reg = <0x0000 0 0 0 0>; }; }; &pcie1 { wifi1: wifi@0,0 { compatible = "mediatek,mt76"; reg = <0x0000 0 0 0 0>; }; }; &gmac0 { nvmem-cells = <&macaddr_factory_e000>; nvmem-cell-names = "mac-address"; }; &state_default { gpio { groups = "jtag", "uart2", "uart3", "wdt"; function = "gpio"; }; }; &factory { compatible = "nvmem-cells"; #address-cells = <1>; #size-cells = <1>; macaddr_factory_e000: macaddr@e000 { reg = <0xe000 0x6>; }; macaddr_factory_e006: macaddr@e006 { reg = <0xe006 0x6>; }; };然后保存退出,继续下一步编译
编译设置菜单
make menuconfig -j$(nproc)然后会出现这样的一个界面
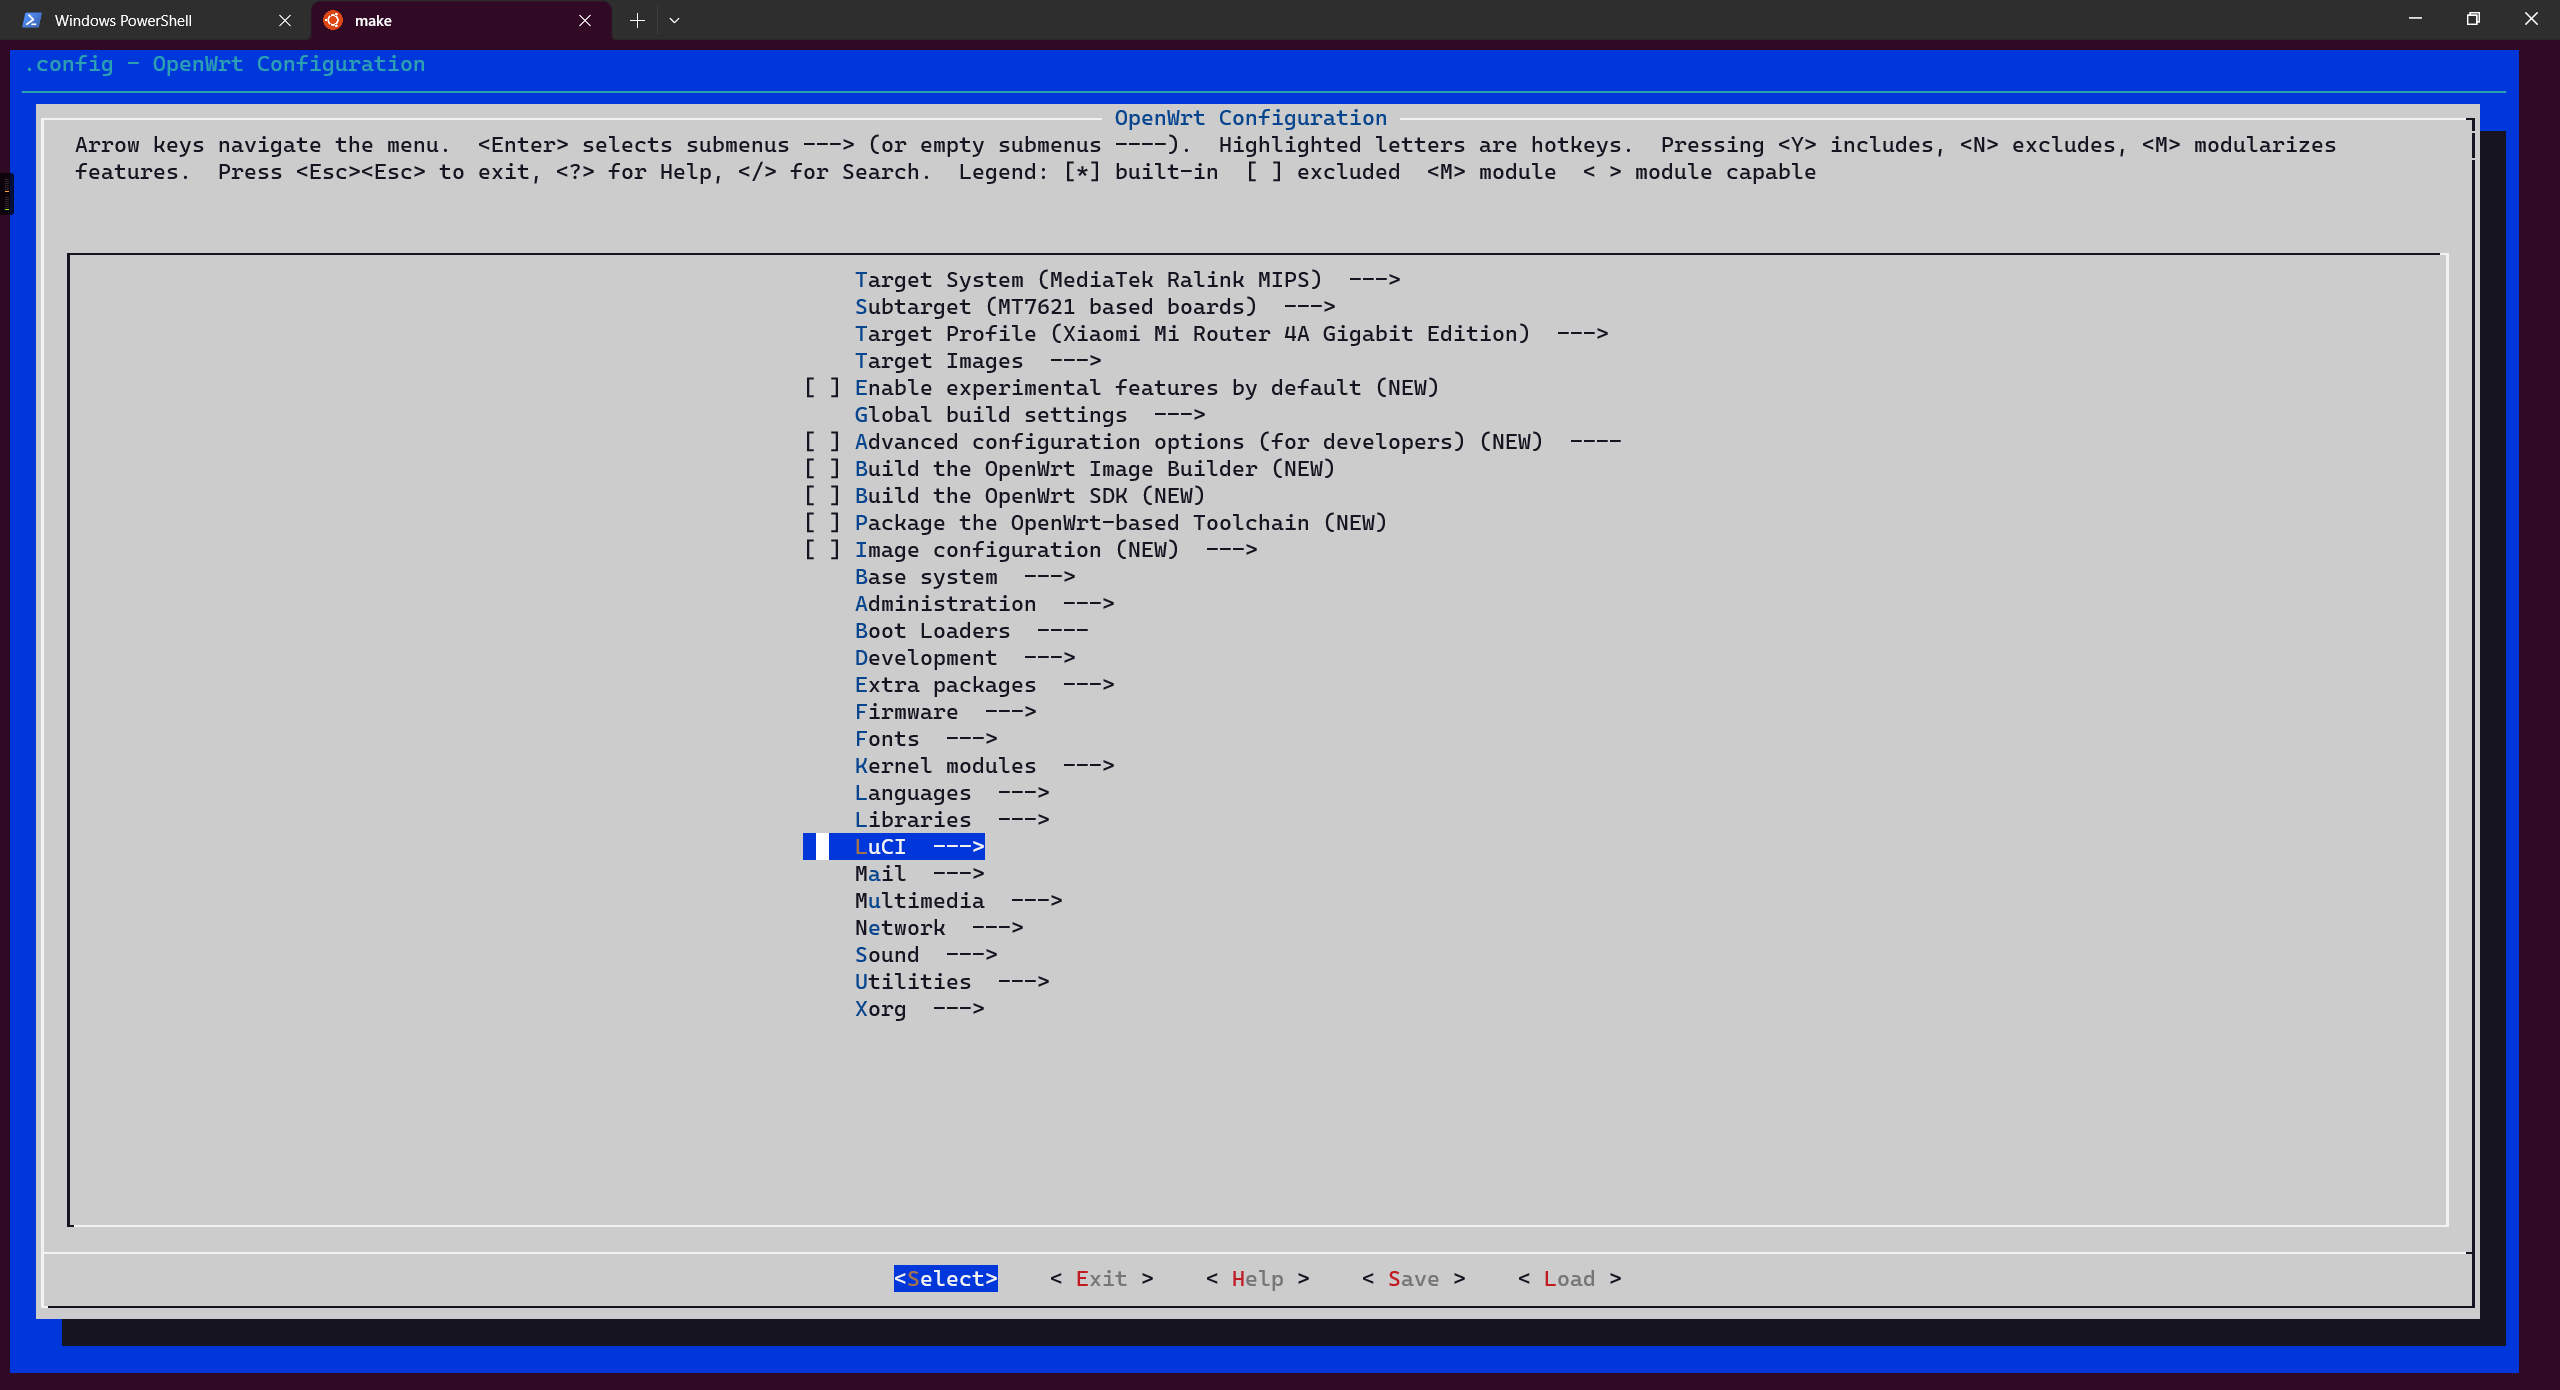
image-20230930153017669 我们要选择下列的这些内容
我们要开始选择我们要编译的设备型号,例如我的设备是小米路由器4A千兆版v1
那么我就首先选择CPU架构为MediaTek ,然后处理器具体型号为mt7621,路由器型号选择对应的硬件即可
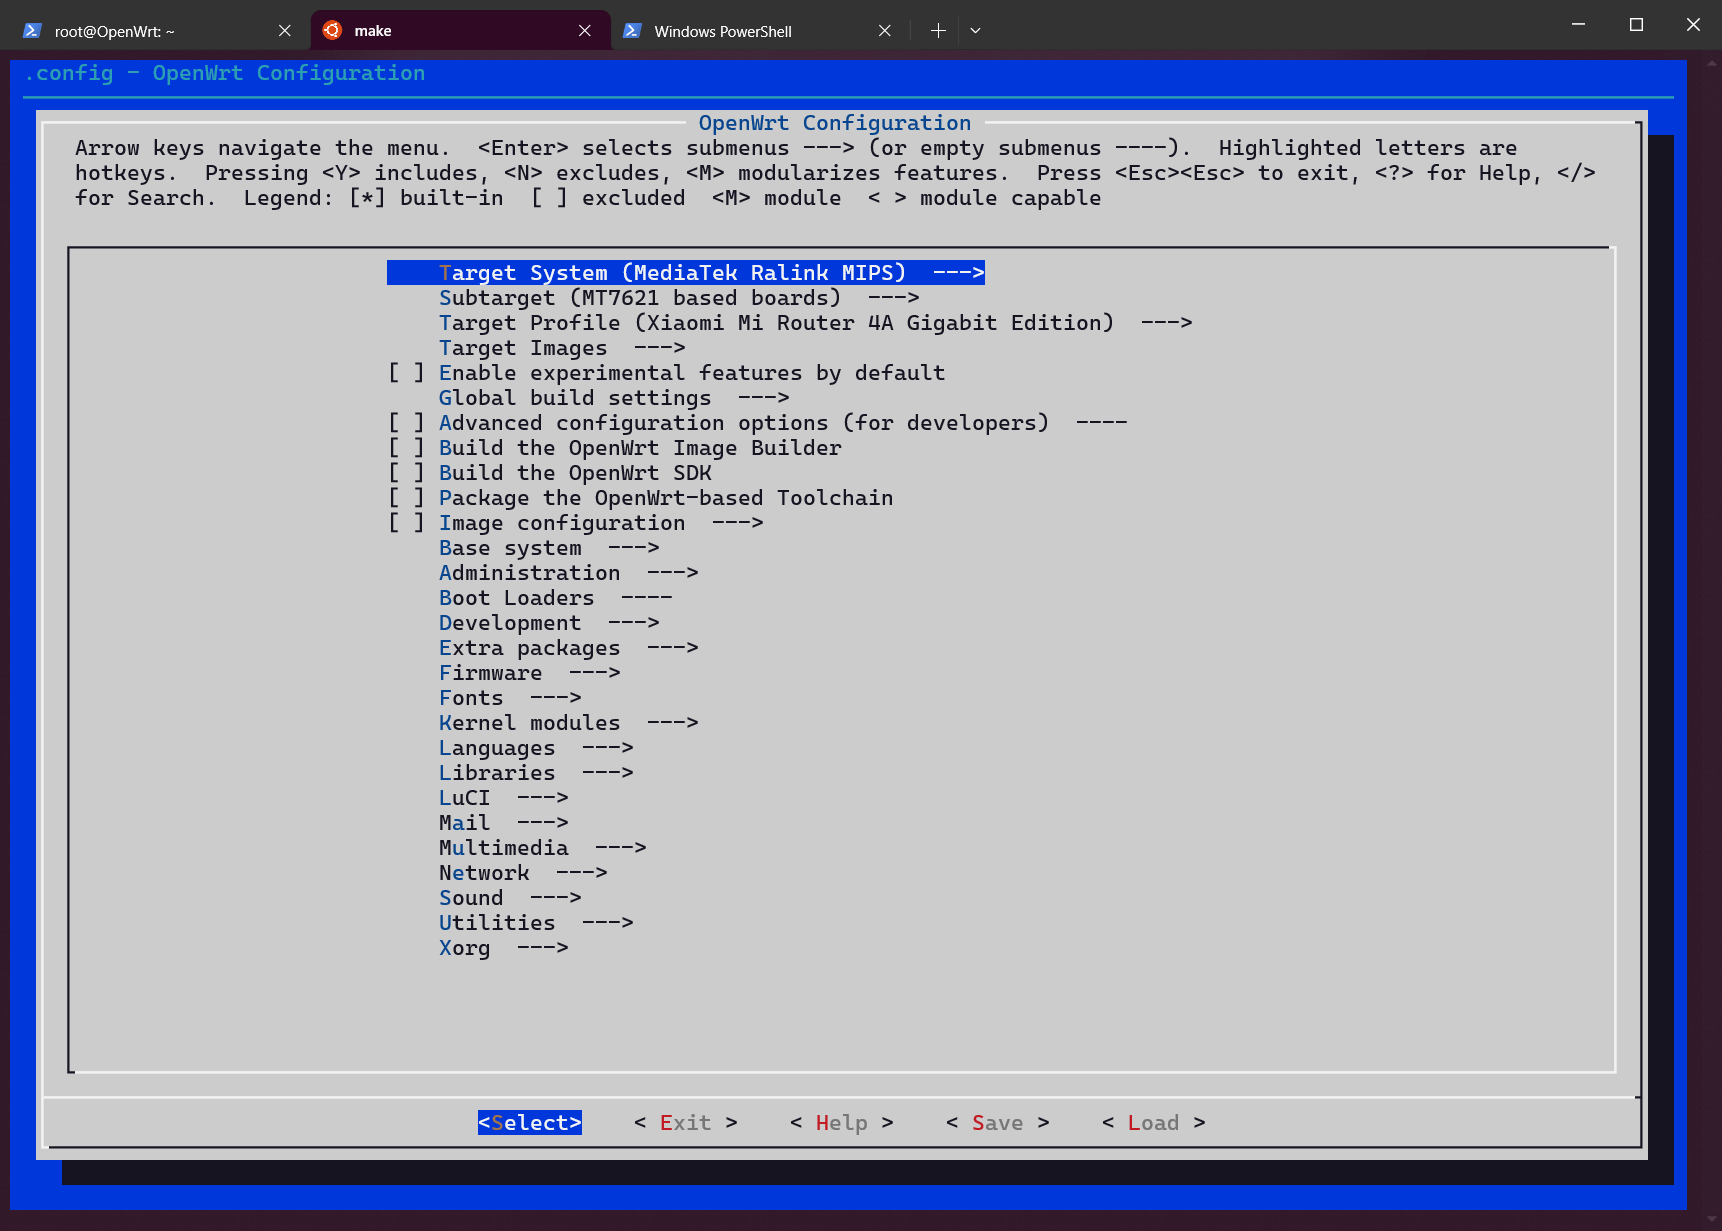
image-20240401110254991 如果你不知道你的设备硬件型号,你可以去OpenWrt设备固件下载官网搜索自己的设备型号,然后可以查看自己的设备平台是什么架构以及处理器,例如我的就是ramips/mt7621
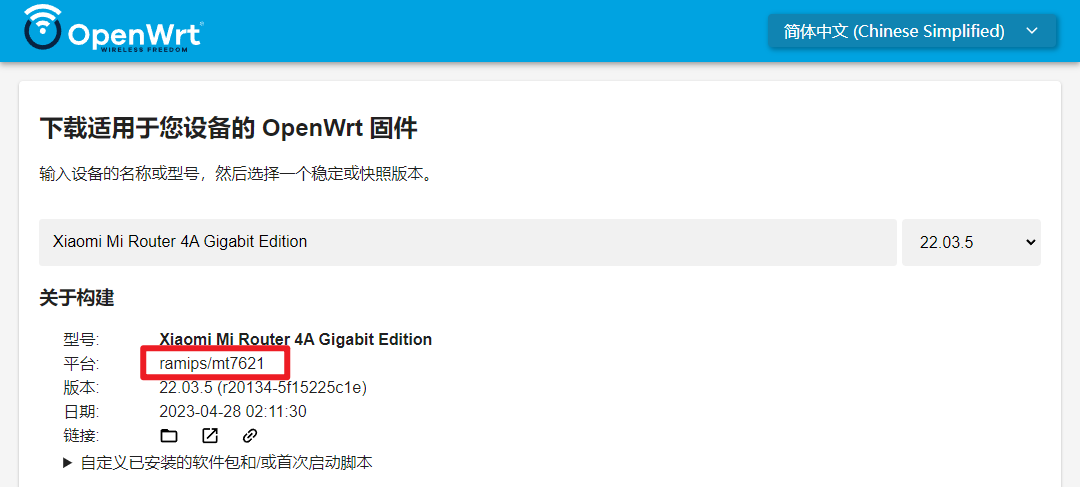
image-20230928175125264 Luci Web可视化界面:
Luci -> Collections ->luciLuci -> Modules -> luci-compat中文语言包:
Luci -> Modules -> Translations -> Chinese Simplified (zh_Hans)ua2f插件:
Network ->Routing and Redirection -> ua2f防TTL检测:
Network -> Firewall -> iptables-mod-ipoptKernel modules -> Netfilter Extensions -> kmod-ipt-ipoptNetwork -> Firewall -> iptables-mod-conntrack-extra运行
make kernel_menuconfig执行过程比较长,具体取决于电脑性能
make kernel_menuconfig -j$(nproc)如果运行这条指令时出现了类似以下报错,请检查执行指令的用户是否为root,如果是root用户,请执行下列命令然后再执行
make kernel_menuconfig即可export FORCE_UNSAFE_CONFIGURE=1报错示例:
make[2]: Entering directory '/root/Work/openwrt/openwrt/scripts/config'
make[2]: 'conf' is up to date.
make[2]: Leaving directory '/root/Work/openwrt/openwrt/scripts/config'
time: target/linux/prereq#0.54#0.75#1.19
 make[1] toolchain/install
 make[2] tools/compile
 make[3] -C tools/flock compile
 make[3] -C tools/xz compile
 make[3] -C tools/sed compile
 make[3] -C tools/libdeflate compile
 make[3] -C tools/patch compile
 make[3] -C tools/tar compile
    ERROR: tools/tar failed to build.
make -r toolchain/install: build failed. Please re-run make with -j1 V=s or V=sc for a higher verbosity level to see what's going on
make: *** [/root/Work/openwrt/openwrt/include/toplevel.mk:232: toolchain/install] Error 1
执行完成后开始配置内核
当你在上一步编译完成后,应该会弹出这个界面
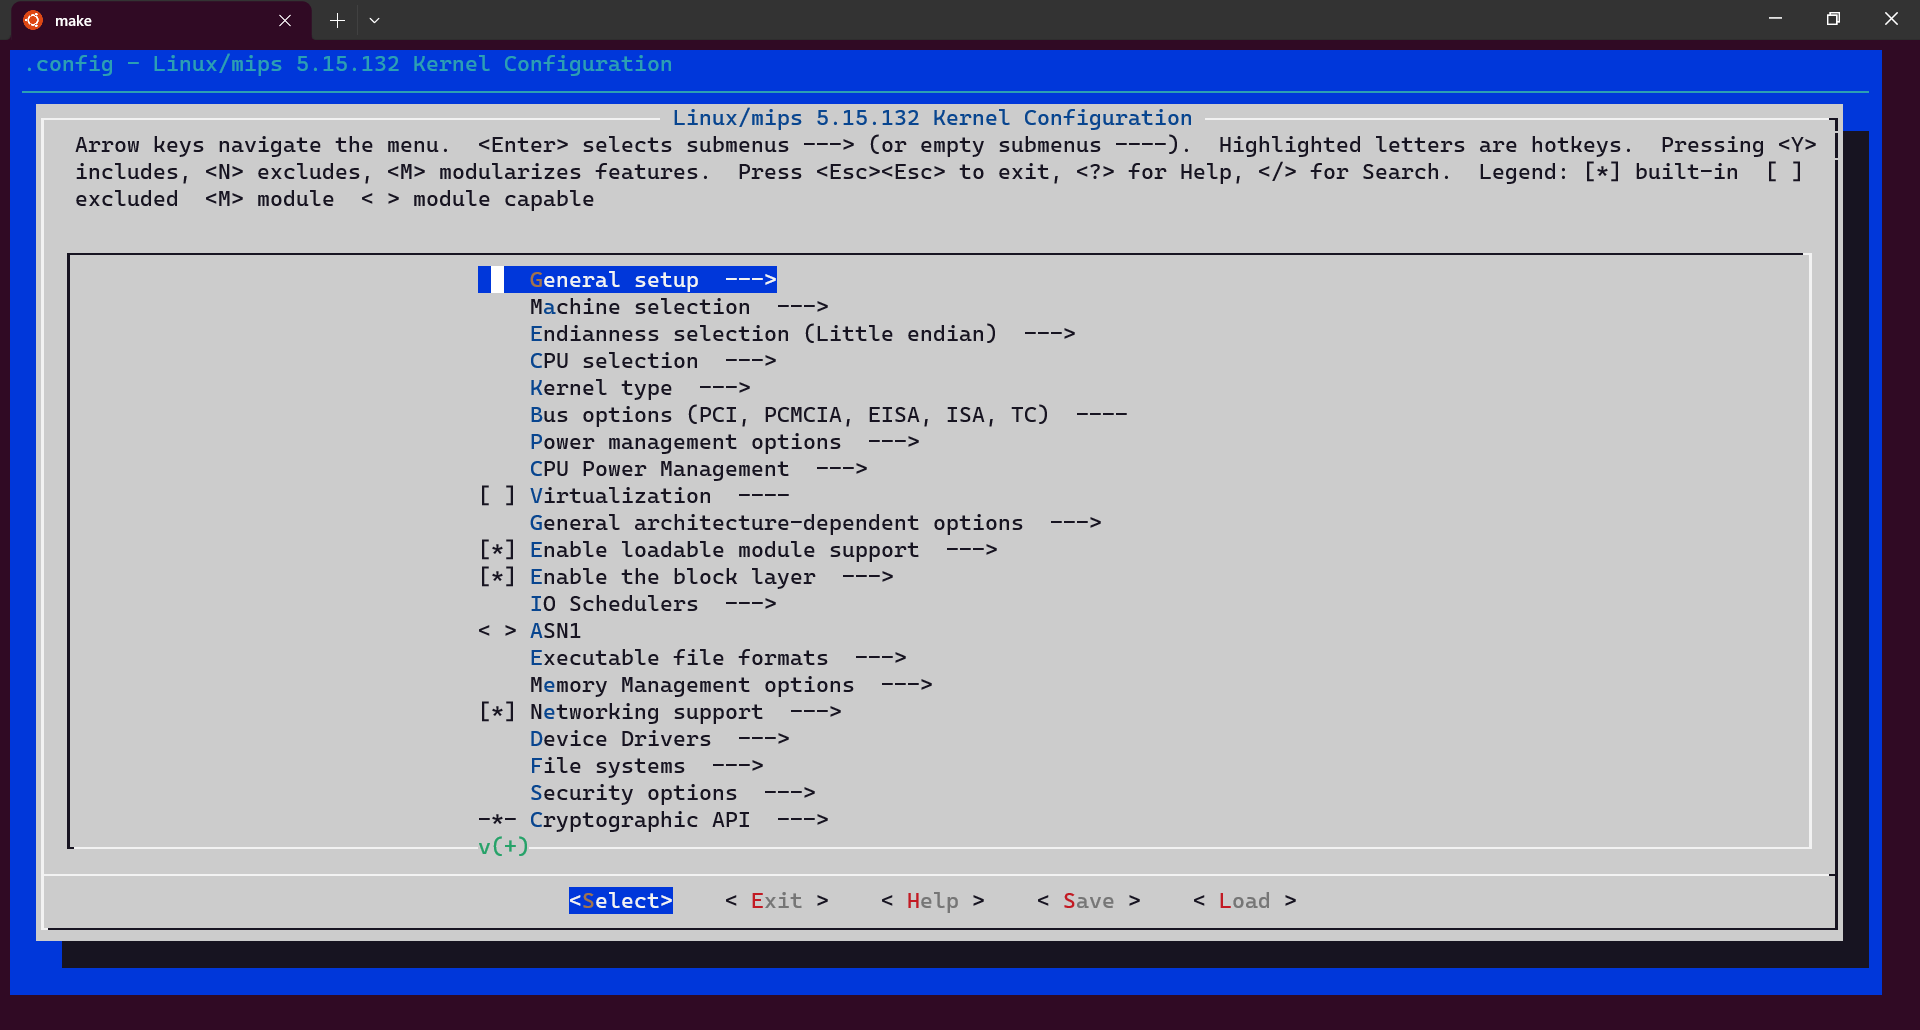
image-20230928195533285 然后我们依次选择
Networking support -> Networking options -> Network packet filtering framework (Netfilter)如图所示勾选上这些模块即可
Netfilter NFNETLINK interfaceNetfilter LOG over NFNETLINK interfaceNetfilter connection tracking supportConnection tracking netlink interfaceNFQUEUE and NFLOG integration with Connection Tracking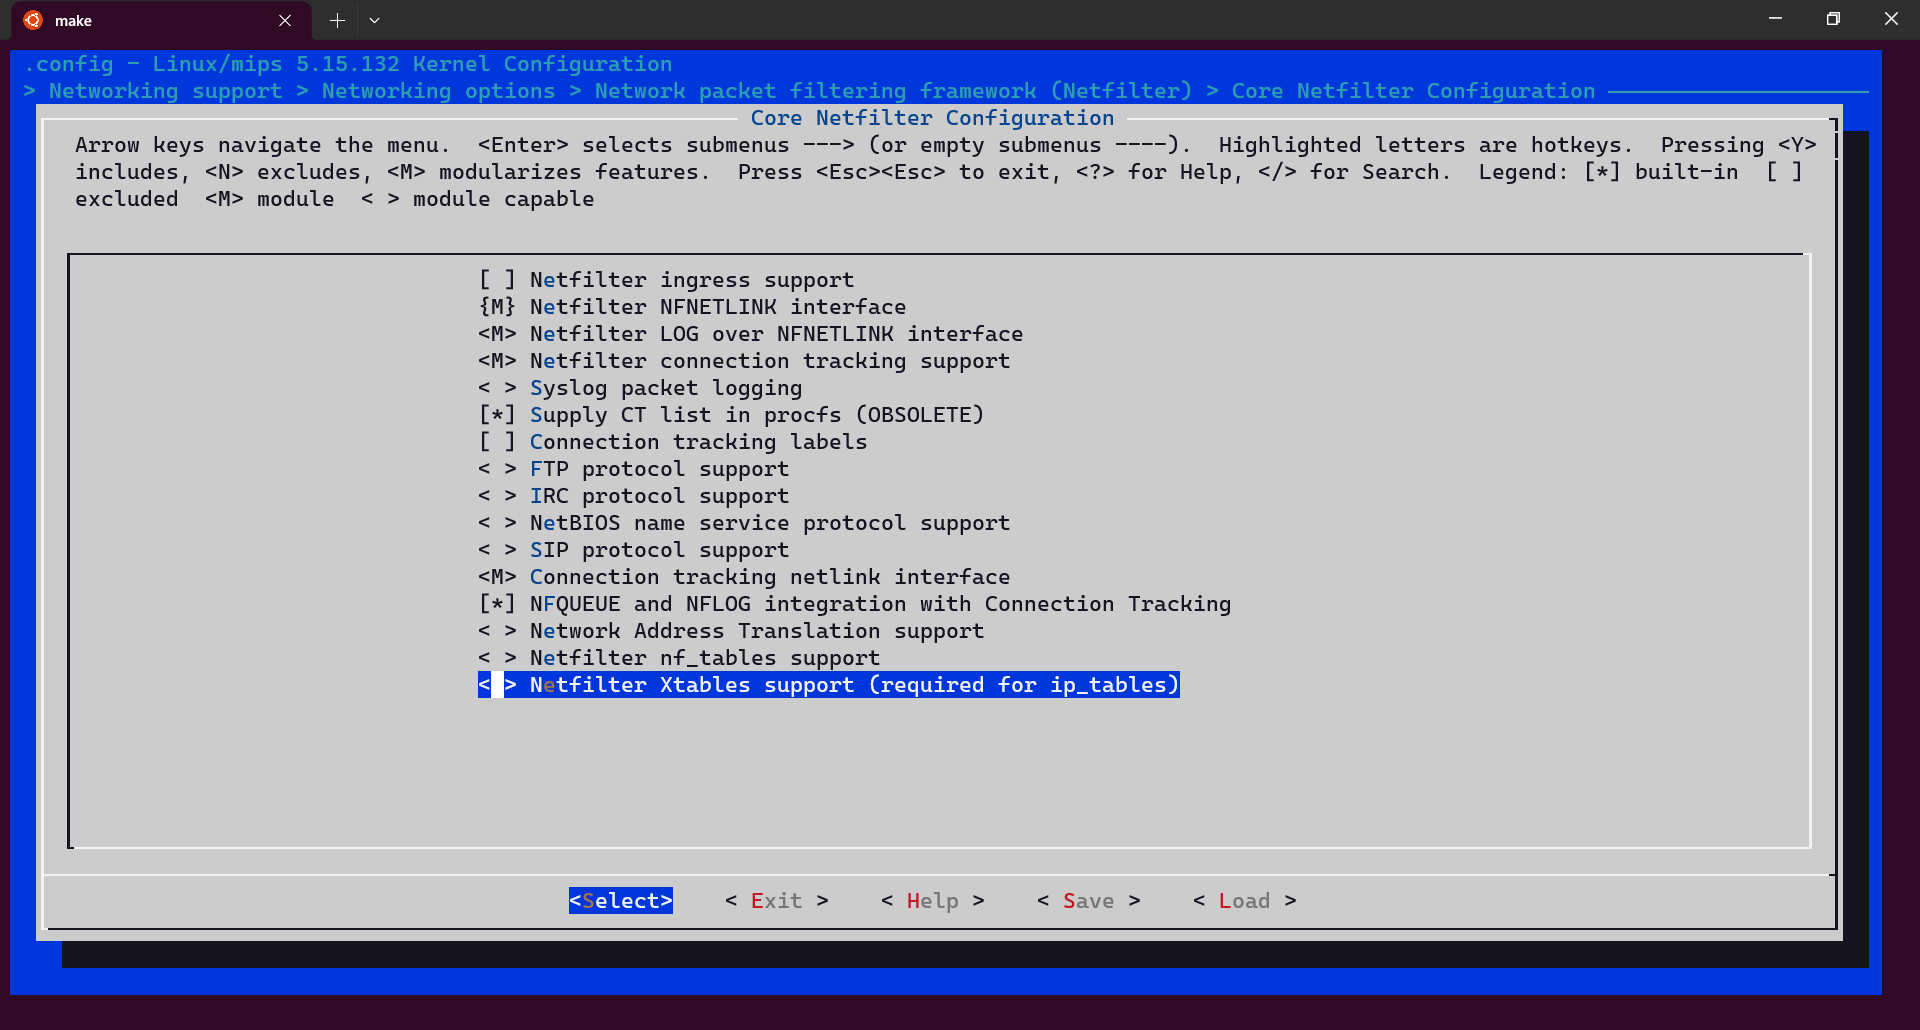
image-20230928195800736 然后选择Save选项,保存并退出
下载软件包+编译
先执行下载软件包的操作,请务必保证网络连接正常,否则会出错!
make download -j$(nproc) V=s执行完成后接着执行编译操作(请根据实际情况选择对应的编译指令,指令最后面的`-j1`中的数字代表线程数,建议第一次编译使用1,如有需要可以根据具体处理器配置来进行配置) ```bash//非WSL的编译指令
make V=s -j1//如果你和作者使用的是WSL平台,请使用这条指令
PATH=/usr/local/sbin:/usr/local/bin:/usr/sbin:/usr/bin:/sbin:/bin make V=s -j1当编译完成后,终端应该显示类似下界面 /内容 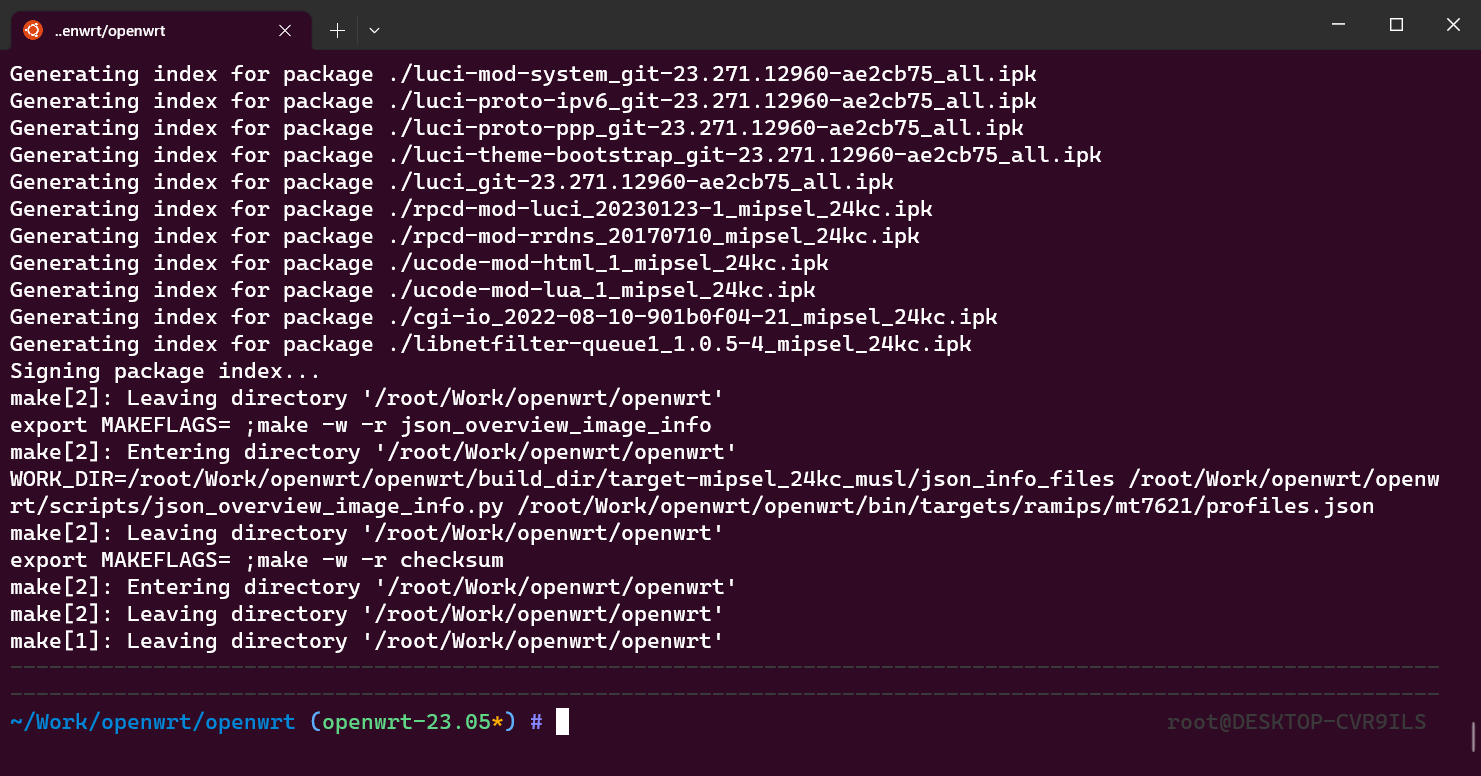 > 若编译报错,可使用以下方法: > 首先确保目前你在从Github上拉取的Openwrt文件目录下 > 然后使用`vim ./package/UA2F/CMakeLists.txt`编辑UA2F的CMake文件 > 将第三行的`set(CMAKE_C_STANDARD 17)`修改为`set(CMAKE_C_STANDARD 11)` > 然后保存退出即可,然后尝试重新进行编译获取编译好的固件文件
编译好的固件文件位于项目目录中的这个路径
bin/targets/ramips/mt7621我们将里面的
openwrt-ramips-mt7621-xiaomi_mi-router-4a-gigabit-initramfs-kernel.bin和openwrt-ramips-mt7621-xiaomi_mi-router-4a-gigabit-squashfs-sysupgrade.bin文件存在电脑本地即可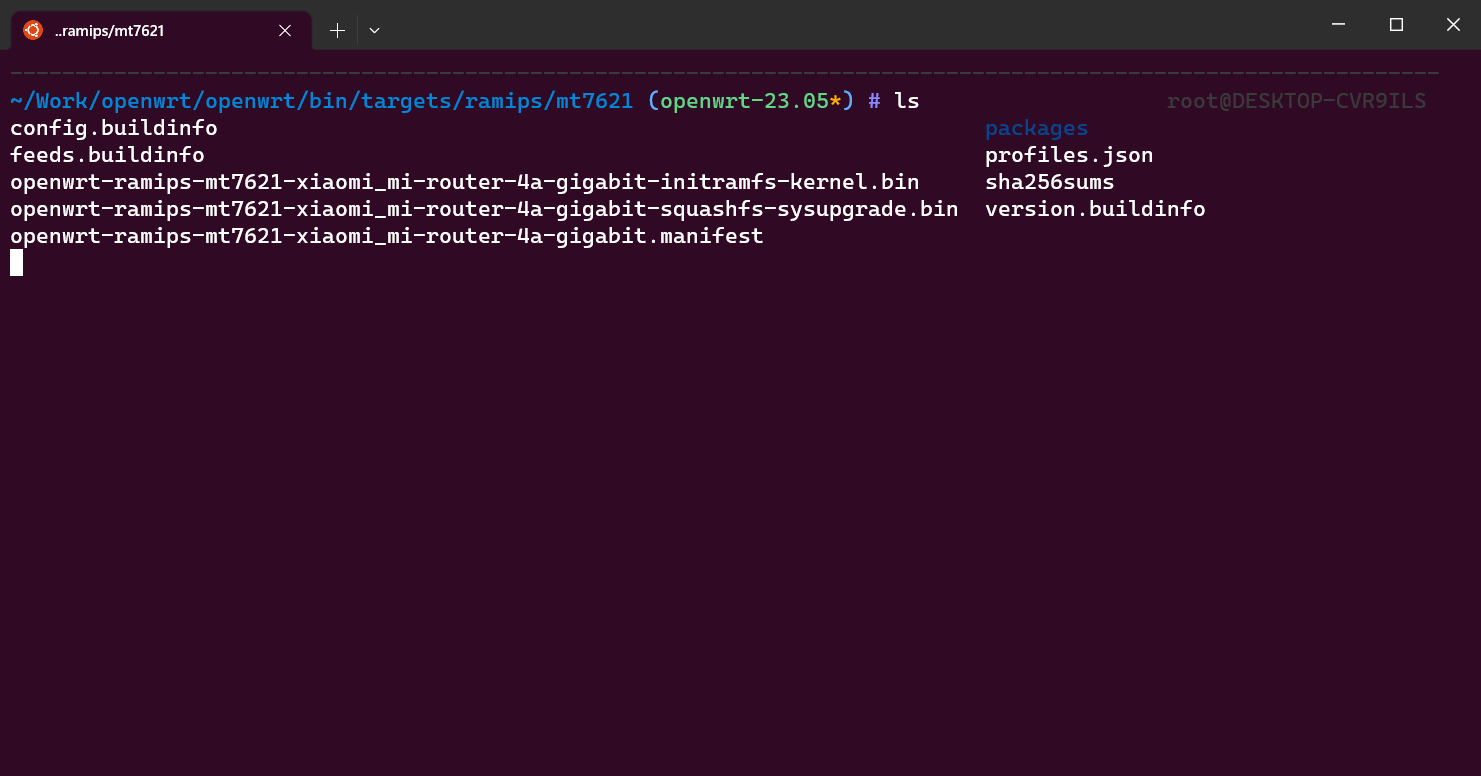
image-20230929200101507
安装固件至路由器
请先给路由器安装Breed固件,记得备份EEPROM,可网上搜寻小米路由器4A安装Breed固件
拔掉电源后按着Reset键插入电源,等待五秒后松开,电脑连接网线到路由器
浏览器输入192.168.1.1打开Breed控制台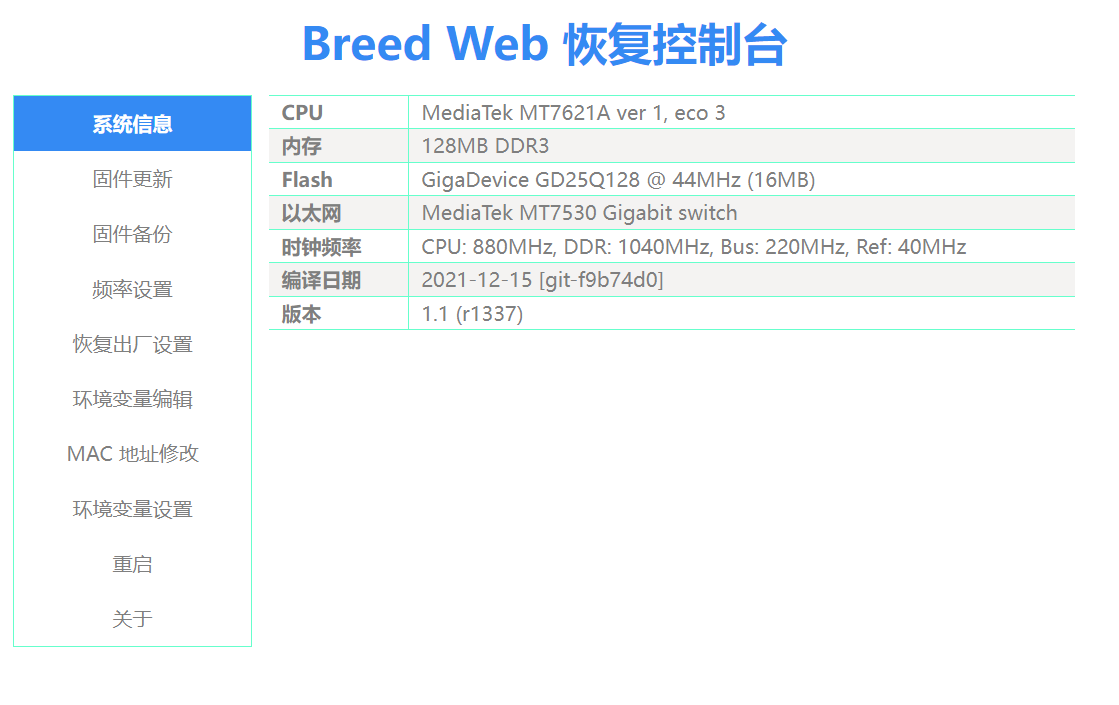
image-20230929200913285 选择固件文件和EEPROM,建议先安装kernel固件然后重启成功后再关机进入Breed刷入sysupgrade固件,记得带上EEPROM
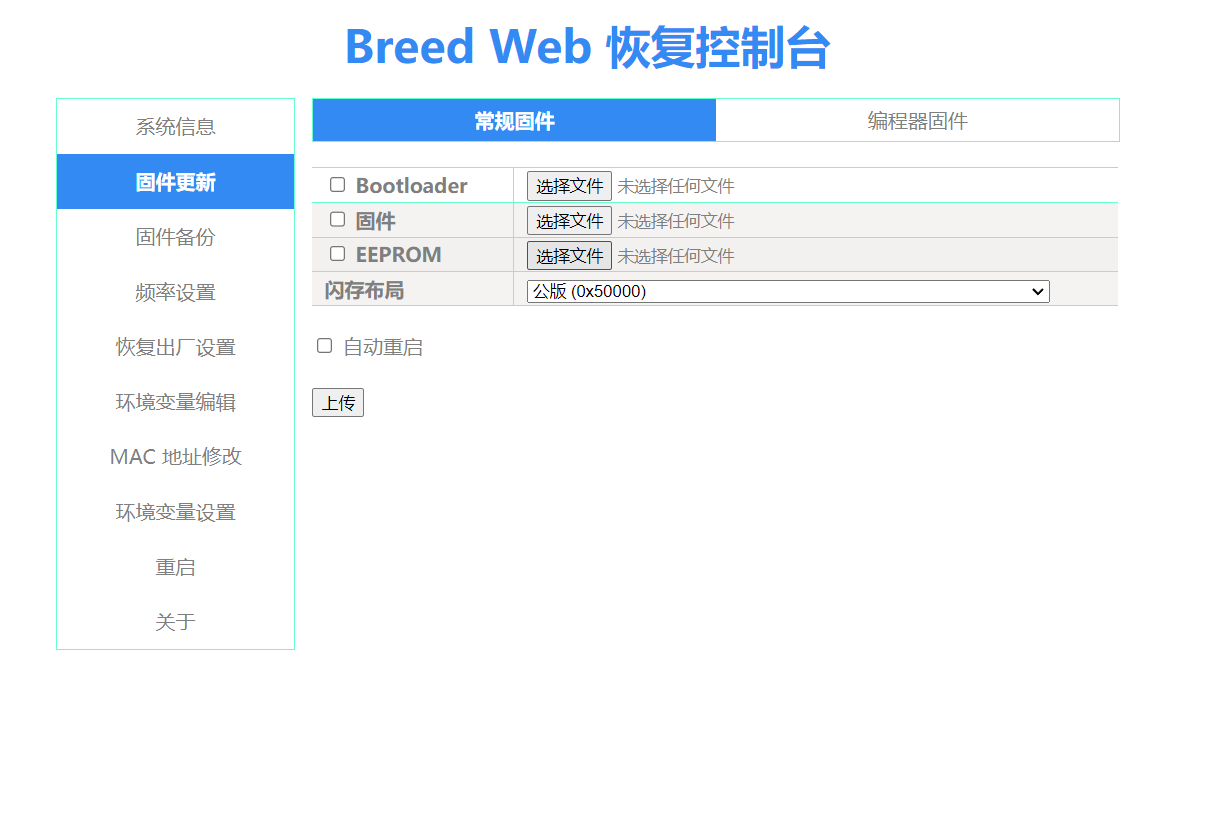
- 打开192.168.1.1即可看到路由器的管理界面
配置OpenWrt系统
- 重启路由器到Breed界面,找到MAC地址修改,将WAN口的MAC地址修改为你的电脑的有线网卡的MAC地址
- 连接路由器的ssh,具体连接方式这里不做过多赘述
配置UA2F,将下列指令依次执行
uci set ua2f.enabled.enabled=1
uci set ua2f.firewall.handle_fw=1
uci set ua2f.firewall.handle_tls=1
uci set ua2f.firewall.handle_mmtls=1
uci set ua2f.firewall.handle_intranet=1
uci commit ua2f
service ua2f enable
service ua2f start
然后配置TTL伪装,由于新版本Openwrt不再使用iptables作为防火墙,而是nftables(fw4)
这里的指令是以nftables为基础设置
nft add rule inet fw4 mangle_forward oifname "wan" ip ttl set 64
nft add rule inet fw4 mangle_forward oifname "wan6" ip ttl set 64
然后编辑/创建这个文件
/etc/firewall.user,将上述指令复制到里面,然后保存然后编辑
/etc/config/firewall文件,在文件的最尾部加入下面的内容config include option path '/etc/firewall.user' option fw4_compatible '1'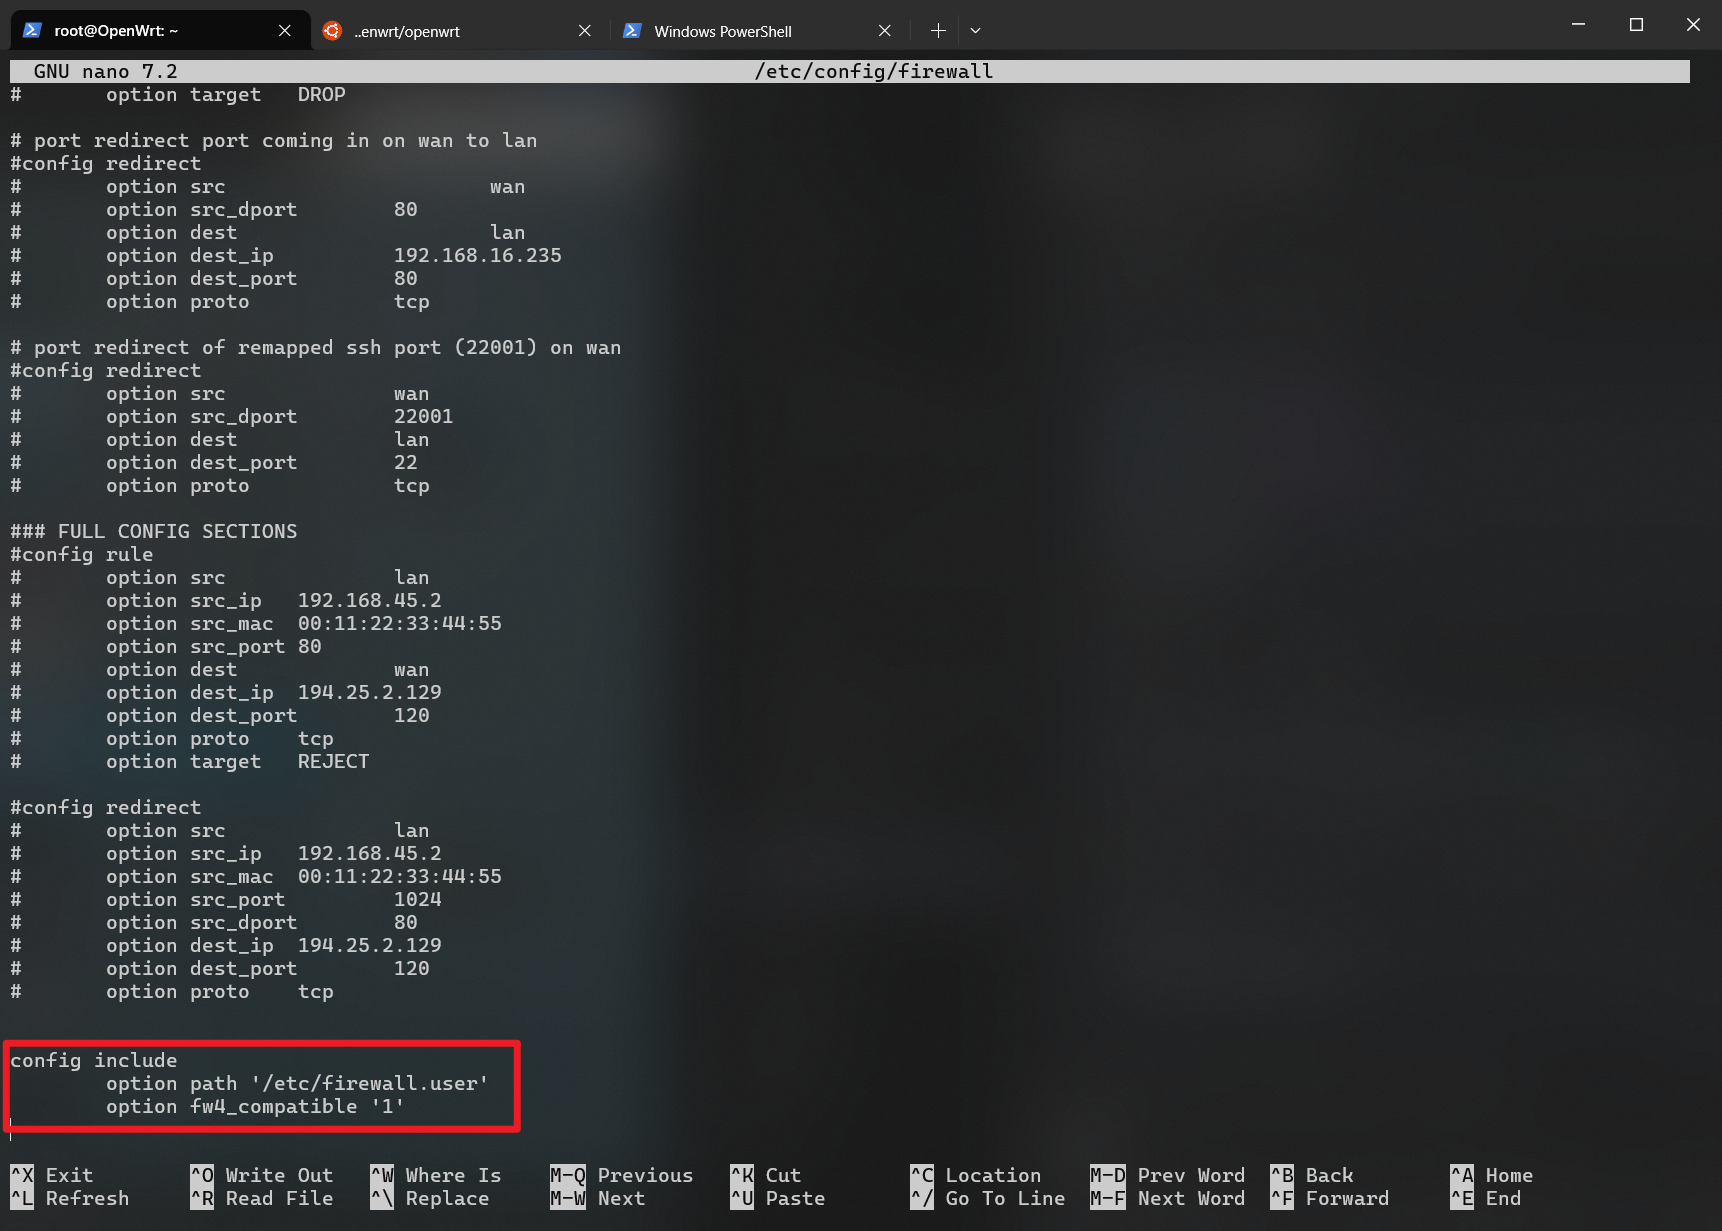
image-20240401113311509 保存退出,然后使用下面的指令重启防火墙
/etc/init.d/firewall restart- 将校园网的网线插入到你的电脑上先进行登录验证,然后拔下来插入到你的路由器的wan口上,然后测试网络连接是否正常
下载
如果你也是同款路由器型号,你可以直接下载我编译好的固件文件,不必重复操作
本固件仅适用于小米路由器4A千兆版v1;国际版、v2、百兆版不可用
固件信息
系统版本:OpenWrt 23.05
硬件设备型号:Xiaomi Mi Router 4A Gigabit Edition v1
编译日期:2024-4-1
openwrt-ramips-mt7621-xiaomi_mi-router-4a-gigabit-initramfs-kernel.bin
MD5:
739ea3fad6bdbeaec9afcfba49905364SHA256:
42cf65ff698c854714af07ef23276fd1d800ed553bd0f42805e6e0d28aaba32bopenwrt-ramips-mt7621-xiaomi_mi-router-4a-gigabit-squashfs-sysupgrade.bin
MD5:
5401396be4ef7eed6258799d1058c7cbSHA256:
6448cd12fc71e7bd9c598f579fd74972f45344feea86aa876abe1a5a27d8f487
鸣谢 / 引用
- https://openwrt.org/docs/guide-developer/toolchain/wsl
- https://tieba.baidu.com/p/8607487641
- https://github.com/kiddin9/OpenWrt_x86-r2s-r4s-r5s-N1/
AC2100 5G没有WiFi信号安装模块:kmod-mt7603 kmod-mt7615-firmware
frpc报错安装 luci-lib-ipkg

